Welcome to your virtual designer... Sometimes, when people ask me what I think about a design project they've tackled on their own, I am left thinking, "Oh, I wish you would have asked me before you spent the money/time on that." Sometimes, the advice is as simple as, "two inches to the left" or "add a contrast color" or "one shade darker" or "no, that chair is way too big for your space" and the design goes from "nice" to "wow!" So, please, please ask me BEFORE you pick a paint color, hang a curtain, or select a flooring.

This is how it works: I am open to any and all design related questions. Just post your question on this blog or email it to me at yabdesign2000@yahoo.com. You can also send me a picture of the item or space for which you need advice. Then I will post your question and answer for others to see and reference. I believe so much in preventing design disasters that I would even make Skype appointments if you have a bigger design dilemma you want to run by me.

So, tell your friends and family and send in your questions and I will address them one by one. I'm looking forward to working with you!

Wednesday, March 23, 2011

Question: I heard I have to have something black in every room. Is that true?


I can understand the concept of having something black in every room. Black can be used in moderation as an accent color that will anchor a room. However, any darker color (not necessarily black) can be used sparingly as a contrast color to the overall decor. For example, a room with different shades of white will come together dramatically with a dark brown wood floor (or window trim, or woven shades). Not only will it act as a stark contrast to the white decor, but it will ironically emphasize the light, calming affect of the different shades of white.

Friday, March 11, 2011

Tip of the Day - Space Planning


So now we've arrived at Space Planning. Yes, it is always best to take the measurements of the overall space. You can buy some graphic paper at any office supply store. Each 1/4 inch square (or 1/2 inch if it's a smaller space) can represent 1 foot. So, measure the space with a tape measure and then draw it out on the graphic paper. Measure the existing furniture that you will be using (mainly the length and width, or depth) and get measurements of the furniture that you want to purchase. For beginners, it is always best to draw the pieces to 1/4" or 1/2" scale (which ever you are using for your floor plan), then cut out the pieces of paper furniture and play with them on your drawn floor plan to see where they might best fit. This will save you time and money as well as the headache of returning a piece of furniture that doesn't fit in the room. Oh, and don't forget to measure the DOORWAYS! You have to make sure you can get the pieces IN the space! Measure elevator doors and widths. Measure stairways and landings, etc. Remember, the most important part about designing - is planning.

Once you have your space planned out with furniture, lamps and area rugs (you will need to draw where you want the rug to go so you'll know what size to buy), then you'll need to pick an inspiration piece. Something that you want to design around. This will determine the colors, textures and overall feel of the space. But we'll talk more about that in the next tip of the day. For now, let's make sure you have a set plan of attack by measuring and playing around with your paper floor plan. Have fun!

Wednesday, March 2, 2011

Tip of the Day: Identifying Feel and Function


OK, so by now, you have survived creating your design budget. The next step is to identify how you want to feel in the space and what activities you want to be able to do in the space. For example, is it a space that needs to calm you (i.e.; bedroom, sun room?), or energize you (i.e.; work-out room?) Does it need to inspire you creatively (i.e.; craft room, music room?), or keep you grounded and focused (i.e.; home office?)

Ask yourself, "How do I want to feel when I walk into this space?"

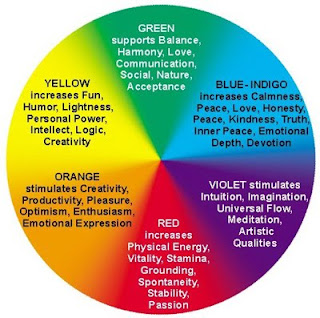
The answer to that question will help you select your color scheme and textures. If you want to feel calm and tranquil, you will want to stay in the blues and purples. If you want to feel energized; yellows, oranges and reds. If you want to feel a sense of balance and comfort, then go with earth tones (greens and browns.)

Next, we need to identify the activities that need to take place in the space. Make a list of all the things that NEED to be able to happen in the space, and then a list of the extra activities that WOULD BE NICE if they could be accommodated in the space. Here are some questions to get you started:

Do I need a surface for studying, or cooking? How many separate surfaces will be used at the same time for different tasks? Do I need a storage space for toys, books, supplies, extra blankets/pillows? How many people need to be able to sit in this space at once? Do I need extra task lighting? Do I need to minimize sound? Do I need a lot of natural light? Do I need to be able to achieve complete darkness?

So, once you identify the desired FEEL of the space and the activities that need to be accommodated in the space, then we get to the fun stuff; pulling together furniture and fixtures, colors, and concepts. See you at the next posting - this is going to get crazy...

Tuesday, March 1, 2011

Tip of the Day - Creating your design budget


Nobody likes this part of the design process. Who can put a dollar amount on true creativity and soul-stirring inspiration? Actually, our husbands can! They are pretty good about abruptly drying out any creative juices that may have been flowing while we are flipping through the design magazine, saying... "Why would any one spend money on that?"

OK, so besides, the whole Mars and Venus thing, we actually have to respect our spouses and our financial responsibilities to each other. And that is why we need a design budget. You know, as a designer, one of the hardest things to do is to get the client to decide on a budget. It's not that they don't want to, they just don't know what things cost.

So, here is the tip of the day: Do your homework. Go ahead and splurge on one or two things that you absolutely must have. Then, look at the other items and google-search the heck out of them. There are always great bargains, knock offs and substitutions out there. And then, with your new knowledge, set a budget about 20% lower than your max (the number that would send your hubby out of the house to "get some air".) Then, really (and I mean REALLY) stick to it. Create a spreadsheet with EVERYTHING you plan to buy on it and then go through each item and price it out - don't forget to allow for labor, taxes and shipping.

Remember, you don't have to get everything at once. Maybe you buy one lamp this paycheck and another next pay check. Then, next month, you can buy the area rug. Maybe you have to sell your kid's run-down dresser first so you can put that money towards the newer chest of drawers. Whatever works (but it would help to have a budget to know what would and wouldn't work, right?) Maybe instead of buying a new nightstand, you just repaint it to freshen it up. Doing your homework and your design budget will help you make these kinds of decisions.

Yes, making a budget is tedious and sometimes painful. But I PROMISE you will be in greater control of your project and much happier when you realize you actually can stay under your budget. Happy planning!

Monday, February 28, 2011

Question: How do I start a project?


Starting a design project can be a very daunting task. But, if you take the time to plan out the project, you will save money, prevent disasters, take less time to finish the project and you will be far more satisfied with the out come than if you had not planned. Over the next few postings, I will elaborate on each stage of the process, but here is the main outline:

1. Identify the space… and Budget!!

2. Identify the intended feel and function of the space.

3. Identify Design Pallet (colors, materials, fabrics)

4. Specify wall colors, floors, doors and trim colors.

5. Window coverings.

6. Furniture

7. Lighting

8. Accents

9. Review/Edit/Budget Check

10. BEGIN!

Tuesday, February 1, 2011

Tip of the Day - Simple Seating


OK, here's a really simple tip for families with small kids. Keep the seating in the main dining area simple. Solid wood or metal. No fabric, cane or rush seating. I know it looks cute and stylish, but to everything there is a season. I don't even want to entertain the thought of picking rice or stuck-on, milk-laced cheerios from the reed-like fibers or $30/yard fabric. And what about Kool-Aid, and spaghetti sauce stains and ice-cream drippings? Naaa. Let's go for practical now and indulge later. Simple!

Thursday, January 27, 2011

Tip of the Day - Hanging clustered picture frames


As a rule of thumb, I like to tell people to use any shape and size, but keep them all one color. There might be some exceptions to the rule (i.e.; different finishes, but all antiques, etc.,) but it is a safe rule to follow. And it is always smart to take the time to make templates and lay them out first before you start nailing away. Also, make sure to take into account the whole space. If you are clustering the pictures on one wall, find the center of the wall from the sides, then start the center of your cluster 2/3 the way up the wall and work your way out. If you are clustering above a piece of furniture (sofa, hall chest, piano etc.) then you still want to stay roughly around 2/3 the way up the wall, but the bottom of your cluster should not be higher than 18" above your piece of furniture - no matter how high your walls are.

Tuesday, January 25, 2011

Tip of the Day - Paint 1 - Test your color


When picking a paint color/s, I strongly advise that, once you have narrowed your selections down to 2 or 3, you purchase the little 1/2 or 1/4 pint samples. That way you can paint a section of the wall and see what the color will look like in that space and with the light specific to that space. You will also be able to see the paint in the morning light, the afternoon light and the evening light - which are all different! Glidden has a wonderful paint tester line that they offer (http://www.glidden.com/products/paint-testers.do) Their sample paint comes in a container with it's own paint brush and enough paint to cover 3 square feet of space. If you are not able to purchase a sample for testing, then make sure you have your paint swatch and tape it to the wall - or get 4or 5 swatches of the same color, take them home and tape them all together to give you a larger sample to look at. Then, look at the swatch on the wall at different times of the day to get a feel for what it will actually look like. Also, you can lift the swatch above your head, with the color of interest facing the ground and that will give you an idea of the darkest shade it will go in that space. You will be amazed at how dark the color gets and even how it seems to change colors!

Monday, January 24, 2011

Tip of the Day - Storage Benches


Storage benches are great multipurpose pieces. They come with separate inner cabinets, outer cubby holes or just one big inner space like a chest. They can be used in almost any room. When in the entry way, they serve as a place for people to sit while removing their shoes, as well as offering a place to put their shoes, instead of cluttering up the floor. They can be used in a mud room, also as a place to sit while removing shoes, but maybe the cubbies hold each child's gloves, scarves and hats. You can organize the separate cabinets however you like. They can also be used in between two twin beds with the top acting as a nightstand table to either bed (remember to put the lamps UP on the wall - see Tip of the Day #2, Up, up and away) Each cabinet can be used for books, or toys, etc. They can also be used in a Music room, as a table, a bench and/or a place to store music books, etc. What about in the basement or family room or multimedia room - any place where you need extra seating - and inside the cabinets or single large chest space, you store even MORE options for seating - large, colorful floor pillows! The list goes on and on...

Friday, January 21, 2011

Tip of the Day - Cabinets/Consoles


In my house, everything has to have more than one function. That is why I LOVE multi-functional furniture!! Here is one example...

In my last house, my TV cabinet, not only housed my TV, cable box, game console/DVD player and receiver, but the bottom TWO drawers housed the kids stuff. The top drawer was organized with diapers, wet wipes and burp cloths and the bottom drawer was easily accessible for the little guys to put their toys. It worked out wonderful. "For everything a place, and everything in it's place." my hero, Peter Walsh.

And if your TV cabinet won't work, never underestimate a darling chest. They are narrow, and can house crayon boxes, my 9 year old's drawings and art supplies, coloring books, games, you name it! No one will ever know!

Tuesday, January 18, 2011

Tip of the Day: Fresh Flowers


Want to brighten your day? Add a sense of crisp spring air in the middle of winter? Pick up a simple garden bouquet the next time you are at the grocery store. Often times, a simple glass container will do the job - clear or colored glass, either will work great. How about even using tin cans - yup, from that evening's dinner. Just peel off the paper and tie some twine or ribbon around the top.

Monday, January 17, 2011

Tip of the Day: Mix & Match


Now, I know it's easier and safer to buy the complete set of furniture at once. But just remember that all the pieces in a furniture group do not have to match. Contrast and compliment are great words to include in your design plan. Basically, if you love a particular piece, buy it. But if you buy too much of the same, then all of a sudden, your favorite piece looses it's magic.

Tip: It's OK to mix and match. Just remember, when doing so, to keep some commonality so that it "compliments" the whole design, i.e.; different chairs, all the same height; or different size picture frames, all the same color; or seating in different fabrics, all within the same color scheme.

Friday, January 14, 2011

Tips of the day - Lighting 4 - Accent Lighting


Accent lighting will really give your space a voice. It will remind you of the often-forgotten spaces that were originally so important during the buying/building process.

Under cabinet lights in the kitchen serve two purposes. They are functional, giving extra light for food prep, and they also add a soft, accenting glow to the space. With the under cabinet lights on or, even better, on dimmers, the home owner is reminded of the full depth of the counters as well as what a wonderful investment the granite (marble/stone/steel/tile, etc) actually turned out to be. And, when the meal is over, and the cook is closing up for the evening, you might hear a soft whisper from the corners of your counters saying, "Hey , look at my beautiful, clean counters... spacious and yearning to be touched again... how about dessert?"

** When searching for your under cabinet lighting, be careful not to get just any LED lights - some tend to be too white and jarring. Ask your hardware clerk for a product with a softer, yellow hue... more similar to incandescent lighting.

Wednesday, January 12, 2011

Tip of the Day - Lighting 3 - Mood lighting - Candles


There are many ways to create mood lighting. Today I want to address candles. Yeah!

What a beautiful way to set the mood for your space. They come in all shapes, sizes and scents. Just dim the lights, light up your candle/s of preference and enjoy the soft, alluring scent and the mesmerizing glow. Instantly feel your heartbeat slow to a calm rhythmic thump and your muscles take a relaxing breath...

Unless you have small kids. In which case, you would not dare introduce such a destructive idea to curious faces... So, the question is how to get that same effect without fire. While not entirely as magical as real candles, there are some pretty descent options out there that will allow you to practice "safety first" while still feeling somewhat connected to the simple pleasures of the grown-up world. Check out battery operated, flameless candles. Below are a few places to look for these candles. Personally, I prefer the ones that hide the flame inside rather than the ones that show it on top of the candle. I just think they look more realistic. I also prefer bunching candles of all one color - in particular, all white, all off-white or all silver-gray. And as far as the scent, you might want to go with the Febreeze option.

Flameless candles can run anywhere from $10-$20+ each, so you will be able to find something that fits your budget. Google: Images, "flameless candles", to see the wide variety that exist.


Tuesday, January 11, 2011

Tip of the Day - Lighting 2 - Night stand lighting


UP, UP and AWAY!

OK. So, my two year old may be little for his age, but as the last of 5 kids, he is definitely tough and determined. When he wants to climb up in bed with me, he reaches as far as he can with both hands to grab the sheet and he pulls with all his might as his little frog legs flip around searching for something with leverage. That is when he found false anchorage on my night-time reading pile of magazines and a novel. With one strong push, there went my pile, and my night stand lamp and everything made a crash landing. Ahhhg!

First of all, I obviously had too much junk on my night stand. Second of all, I know better about the lamp!! So, for all of you out there who can relate to my story... If you have small night stands or little kids or both, try investing in wall sconces. They run about $30+ and they are actually really pretty. You can also get a cord cover for about $8 that will hide the cord behind the metal protector - keeping it out of sight from curious hip-high eyes and fingers.

Ahhhh. A clean and organized table surface, now with space to spare. And the lamp? Up, up and away! Sigh...

A great and inexpensive place to start your search for bedroom wall sconces:

Monday, January 10, 2011

Tip of the Day - Lighting 1 - task lighting


Ok, so this week, I'd like to gear the tips towards lighting. Something most house holds need more of...

Task lighting. Make sure you have lighting specific to the task you are doing. If in an office, you should have a task lamp over your desk area. If you have a favorite chair where you like to curl up and read or knit, there should be a task light just for that space. At a child's desk for homework, over a craft table, under the cabinet or over the counter for food prep, etc. You will see, task lighting makes a WORLD of difference!!